总结常用的es6语法(自己动手写符合自己业务需求的eslint规则)
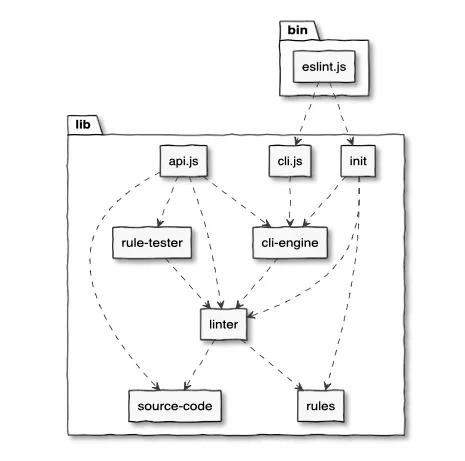
简介:eslint是构建在AST Parser基础上的规则扫描器,缺省情况下使用espree作为AST解析器。rules写好对于AST事件的回调,linter处理源代码之后会根据相应的事件来回调rules中的处理函数。另外,在进入细节之前,请思考一下:eslint的边界在哪里?哪些功能是通过eslint写规则可以做到的,哪些是用eslint无法做到的?
作者 | 旭伦来源 | 阿里技术公众号
使用eslint和stylelint之类的工具扫描前端代码现在已经基本成为前端同学的标配。但是,业务这么复杂,指望eslint等提供的工具完全解决业务中遇到的代码问题还是不太现实的。我们一线业务同学也要有自己的写规则的能力。
eslint是构建在AST Parser基础上的规则扫描器,缺省情况下使用espree作为AST解析器。rules写好对于AST事件的回调,linter处理源代码之后会根据相应的事件来回调rules中的处理函数。
另外,在进入细节之前,请思考一下:eslint的边界在哪里?哪些功能是通过eslint写规则可以做到的,哪些是用eslint无法做到的?
一 先学会如何写规则测试兵马未动,测试先行。规则写出来,如何用实际代码进行测试呢?
所幸非常简单,直接写个json串把代码写进来就好了。
我们来看个no-console的例子,就是不允许代码中出现console.*语句的规则。
首先把规则和测试运行对象ruleTester引进来:
//------------------------------------------------------------------------------
// Requirements
//------------------------------------------------------------------------------

const rule = require("../../../lib/rules/no-console"),
    { RuleTester } = require("../../../lib/rule-tester");

//------------------------------------------------------------------------------
// Tests
//------------------------------------------------------------------------------

const ruleTester = new RuleTester();
然后我们就直接调用ruleTester的run函数就好了。有效的样例放在valid下面,无效的样例放在invalid下面,是不是很简单。
我们先看下有效的:
ruleTester.run("no-console", rule, {
    valid: [
        "Console.info(foo)",

        // single array item
        { code: "console.info(foo)", options: [{ allow: ["info"] }] },
        { code: "console.warn(foo)", options: [{ allow: ["warn"] }] },
        { code: "console.error(foo)", options: [{ allow: ["error"] }] },
        { code: "console.log(foo)", options: [{ allow: ["log"] }] },

        // multiple array items
        { code: "console.info(foo)", options: [{ allow: ["warn", "info"] }] },
        { code: "console.warn(foo)", options: [{ allow: ["error", "warn"] }] },
        { code: "console.error(foo)", options: [{ allow: ["log", "error"] }] },
        { code: "console.log(foo)", options: [{ allow: ["info", "log", "warn"] }] },

        // https://github.com/eslint/eslint/issues/7010
        "var console = require('myconsole'); console.log(foo)"
    ],
能通过的情况比较容易,我们就直接给代码和选项就好。
然后是无效的:
    invalid: [

        // no options
        { code: "console.log(foo)", errors: [{ messageId: "unexpected", type: "MemberExpression" }] },
        { code: "console.error(foo)", errors: [{ messageId: "unexpected", type: "MemberExpression" }] },
        { code: "console.info(foo)", errors: [{ messageId: "unexpected", type: "MemberExpression" }] },
        { code: "console.warn(foo)", errors: [{ messageId: "unexpected", type: "MemberExpression" }] },

        //  one option
        { code: "console.log(foo)", options: [{ allow: ["error"] }], errors: [{ messageId: "unexpected", type: "MemberExpression" }] },
        { code: "console.error(foo)", options: [{ allow: ["warn"] }], errors: [{ messageId: "unexpected", type: "MemberExpression" }] },
        { code: "console.info(foo)", options: [{ allow: ["log"] }], errors: [{ messageId: "unexpected", type: "MemberExpression" }] },
        { code: "console.warn(foo)", options: [{ allow: ["error"] }], errors: [{ messageId: "unexpected", type: "MemberExpression" }] },

        // multiple options
        { code: "console.log(foo)", options: [{ allow: ["warn", "info"] }], errors: [{ messageId: "unexpected", type: "MemberExpression" }] },
        { code: "console.error(foo)", options: [{ allow: ["warn", "info", "log"] }], errors: [{ messageId: "unexpected", type: "MemberExpression" }] },
        { code: "console.info(foo)", options: [{ allow: ["warn", "error", "log"] }], errors: [{ messageId: "unexpected", type: "MemberExpression" }] },
        { code: "console.warn(foo)", options: [{ allow: ["info", "log"] }], errors: [{ messageId: "unexpected", type: "MemberExpression" }] },

        // In case that implicit global variable of 'console' exists
        { code: "console.log(foo)", env: { node: true }, errors: [{ messageId: "unexpected", type: "MemberExpression" }] }
    ]
});
无效的要判断下出错信息是不是符合预期。
我们使用mocha运行下上面的测试脚本:
./node_modules/.bin/mocha tests/lib/rules/no-console.js运行结果如下:
  no-console
    valid
      ✓ Console.info(foo)
      ✓ console.info(foo)
      ✓ console.warn(foo)
      ✓ console.error(foo)
      ✓ console.log(foo)
      ✓ console.info(foo)
      ✓ console.warn(foo)
      ✓ console.error(foo)
      ✓ console.log(foo)
      ✓ var console = require('myconsole'); console.log(foo)
    invalid
      ✓ console.log(foo)
      ✓ console.error(foo)
      ✓ console.info(foo)
      ✓ console.warn(foo)
      ✓ console.log(foo)
      ✓ console.error(foo)
      ✓ console.info(foo)
      ✓ console.warn(foo)
      ✓ console.log(foo)
      ✓ console.error(foo)
      ✓ console.info(foo)
      ✓ console.warn(foo)
      ✓ console.log(foo)


  23 passing (83ms)
如果在valid里面放一个不能通过的,则会报错,比如我们加一个:
ruleTester.run("no-console", rule, {
    valid: [
        "Console.info(foo)",

        // single array item
        { code: "console.log('Hello,World')", options: [] },
就会报下面的错:
  1 failing

  1) no-console
       valid
         console.log('Hello,World'):

      AssertionError [ERR_ASSERTION]: Should have no errors but had 1: [
  {
    ruleId: 'no-console',
    severity: 1,
    message: 'Unexpected console statement.',
    line: 1,
    column: 1,
    nodeType: 'MemberExpression',
    messageId: 'unexpected',
    endLine: 1,
    endColumn: 12
  }
]
        expected - actual

      -1
       0

      at testValidTemplate (lib/rule-tester/rule-tester.js:697:20)
      at Context.< anonymous> (lib/rule-tester/rule-tester.js:972:29)
      at processImmediate (node:internal/timers:464:21)
说明我们刚加的console是会报一个messageId为unexpected,而nodeType为MemberExpression的错误。
我们应将其放入到invalid里面:
invalid: [

    // no options
    { code: "console.log('Hello,World')", errors: [{ messageId: "unexpected", type: "MemberExpression" }] },
再运行,就可以成功了:
二 规则入门
invalid ✓ console.log('Hello,World')会跑测试之后,我们就可以写自己的规则啦。
我们先看下规则的模板,其实主要要提供meta对象和create方法:
module.exports = {
    meta: {
        type: "规则类型,如suggestion",

        docs: {
            description: "规则描述",
            category: "规则分类:如Possible Errors",
            recommended: true,
            url: "说明规则的文档地址,如https://eslint.org/docs/rules/no-extra-semi"
        },
        fixable: "是否可以修复,如code",
        schema: [] // 选项
    },
    create: Function(context) {
        return {
            // 事件回调
        };
    }
};
总体来说,一个eslint规则所能做的事情,就是写事件回调函数,在回调函数中使用context中获取的AST等信息进行分析。
context提供的API是比较简洁的:
代码信息类主要我们使用getScope获取作用域的信息,getAncestors获取上一级AST节点,getDeclaredVariables获取变量表。最后的绝招是直接获取源代码getSourceCode自己分析去。
markVariableAsUsed用于跨文件分析,用于分析变量的使用情况。
report函数用于输出分析结果,比如报错信息、修改建议和自动修复的代码等。
这么说太抽象了,我们来看例子。
还以no-console为例,我们先看meta部分,这部分不涉及逻辑代码,都是一些配置:
    meta: {
        type: "suggestion",

        docs: {
            description: "disallow the use of `console`",
            recommended: false,
            url: "https://eslint.org/docs/rules/no-console"
        },

        schema: [
            {
                type: "object",
                properties: {
                    allow: {
                        type: "array",
                        items: {
                            type: "string"
                        },
                        minItems: 1,
                        uniqueItems: true
                    }
                },
                additionalProperties: false
            }
        ],

        messages: {
            unexpected: "Unexpected console statement."
        }
    },
我们再看no-console的回调函数,只处理一处Program:exit, 这是程序退出的事件:
1 获取作用域和AST信息
return { "Program:exit"() { const scope = context.getScope(); const consoleVar = astUtils.getVariableByName(scope, "console"); const shadowed = consoleVar && consoleVar.defs.length > 0; /* * 'scope.through' includes all references to undefined * variables. If the variable 'console' is not defined, it uses * 'scope.through'. */ const references = consoleVar ? consoleVar.references : scope.through.filter(isConsole); if (!shadowed) { references .filter(isMemberAccessExceptAllowed) .forEach(report); } } };我们首先通过context.getScope()获取作用域信息。作用域与AST的对应关系如下图:
我们前面的console语句的例子,首先拿到的都是全局作用域,举例如下:
< ref *1> GlobalScope {
  type: 'global',
  set: Map(38) {
    'Array' => Variable {
      name: 'Array',
      identifiers: [],
      references: [],
      defs: [],
      tainted: false,
      stack: true,
      scope: [Circular *1],
      eslintImplicitGlobalSetting: 'readonly',
      eslintExplicitGlobal: false,
      eslintExplicitGlobalComments: undefined,
      writeable: false
    },
    'Boolean' => Variable {
      name: 'Boolean',
      identifiers: [],
      references: [],
      defs: [],
      tainted: false,
      stack: true,
      scope: [Circular *1],
      eslintImplicitGlobalSetting: 'readonly',
      eslintExplicitGlobal: false,
      eslintExplicitGlobalComments: undefined,
      writeable: false
    },
    'constructor' => Variable {
      name: 'constructor',
      identifiers: [],
      references: [],
      defs: [],
      tainted: false,
      stack: true,
      scope: [Circular *1],
      eslintImplicitGlobalSetting: 'readonly',
      eslintExplicitGlobal: false,
      eslintExplicitGlobalComments: undefined,
      writeable: false
    },
...
具体看一下38个全局变量,复习下Javascript基础吧:
    set: Map(38) {
      'Array' => [Variable],
      'Boolean' => [Variable],
      'constructor' => [Variable],
      'Date' => [Variable],
      'decodeURI' => [Variable],
      'decodeURIComponent' => [Variable],
      'encodeURI' => [Variable],
      'encodeURIComponent' => [Variable],
      'Error' => [Variable],
      'escape' => [Variable],
      'eval' => [Variable],
      'EvalError' => [Variable],
      'Function' => [Variable],
      'hasOwnProperty' => [Variable],
      'Infinity' => [Variable],
      'isFinite' => [Variable],
      'isNaN' => [Variable],
      'isPrototypeOf' => [Variable],
      'JSON' => [Variable],
      'Math' => [Variable],
      'NaN' => [Variable],
      'Number' => [Variable],
      'Object' => [Variable],
      'parseFloat' => [Variable],
      'parseInt' => [Variable],
      'propertyIsEnumerable' => [Variable],
      'RangeError' => [Variable],
      'ReferenceError' => [Variable],
      'RegExp' => [Variable],
      'String' => [Variable],
      'SyntaxError' => [Variable],
      'toLocaleString' => [Variable],
      'toString' => [Variable],
      'TypeError' => [Variable],
      'undefined' => [Variable],
      'unescape' => [Variable],
      'URIError' => [Variable],
      'valueOf' => [Variable]
    },
我们看到,所有的变量,都以一个名为set的Map中,这样我们就可以以遍历获取所有的变量。
针对no-console的规则,我们主要是要查找是否有叫console的变量名。于是可以这么写:
    getVariableByName(initScope, name) {
        let scope = initScope;

        while (scope) {
            const variable = scope.set.get(name);

            if (variable) {
                return variable;
            }

            scope = scope.upper;
        }

        return null;
    },
我们可以在刚才列出的38个变量中发现,console是并没有定义的变量,所以
const consoleVar = astUtils.getVariableByName(scope, "console");的结果是null.
于是我们要去查找未定义的变量,这部分是在scope.through中,果然找到了name是console的节点:
[
  Reference {
    identifier: Node {
      type: 'Identifier',
      loc: [SourceLocation],
      range: [Array],
      name: 'console',
      parent: [Node]
    },
    from: < ref *2> GlobalScope {
      type: 'global',
      set: [Map],
      taints: Map(0) {},
      dynamic: true,
      block: [Node],
      through: [Circular *1],
      variables: [Array],
      references: [Array],
      variableScope: [Circular *2],
      functionExpressionScope: false,
      directCallToEvalScope: false,
      thisFound: false,
      __left: null,
      upper: null,
      isStrict: false,
      childScopes: [],
      __declaredVariables: [WeakMap],
      implicit: [Object]
    },
    tainted: false,
    resolved: null,
    flag: 1,
    __maybeImplicitGlobal: undefined
  }
]
这样我们就可以写个检查reference的名字是不是console的函数就好:
        function isConsole(reference) {
            const id = reference.identifier;

            return id && id.name === "console";
        }
然后用这个函数去filter scope.though中的所有未定义的变量:
scope.through.filter(isConsole);最后一步是输出报告,针对过滤出的reference进行报告:
                    references
                        .filter(isMemberAccessExceptAllowed)
                        .forEach(report);
报告问题使用context的report函数:
    function report(reference) {
        const node = reference.identifier.parent;

        context.report({
            node,
            loc: node.loc,
            messageId: "unexpected"
        });
    }
发生问题的代码行数可以从node中获取到。
2 处理特定类型的语句no-console从规则书写上并不是最容易的,我们以其为例主要是这类问题最多。下面我们举一反三,看看针对其它不应该出现的语句该如何处理。
其中最简单的就是针对一类语句统统报错,比如no-continue规则,就是遇到ContinueStatement就报错:
module.exports = {
    meta: {
        type: "suggestion",

        docs: {
            description: "disallow `continue` statements",
            recommended: false,
            url: "https://eslint.org/docs/rules/no-continue"
        },

        schema: [],

        messages: {
            unexpected: "Unexpected use of continue statement."
        }
    },

    create(context) {

        return {
            ContinueStatement(node) {
                context.report({ node, messageId: "unexpected" });
            }
        };

    }
};
不允许使用debugger的no-debugger规则:
    create(context) {

        return {
            DebuggerStatement(node) {
                context.report({
                    node,
                    messageId: "unexpected"
                });
            }
        };

    }
不许使用with语句:
    create(context) {

        return {
            WithStatement(node) {
                context.report({ node, messageId: "unexpectedWith" });
            }
        };

    }
在case语句中不许定义变量、函数和类:
    create(context) {
        function isLexicalDeclaration(node) {
            switch (node.type) {
                case "FunctionDeclaration":
                case "ClassDeclaration":
                    return true;
                case "VariableDeclaration":
                    return node.kind !== "var";
                default:
                    return false;
            }
        }

        return {
            SwitchCase(node) {
                for (let i = 0; i < node.consequent.length; i  ) {
                    const statement = node.consequent[i];

                    if (isLexicalDeclaration(statement)) {
                        context.report({
                            node: statement,
                            messageId: "unexpected"
                        });
                    }
                }
            }
        };

    }
多个类型语句可以共用一个处理函数。
比如不许使用构造方法生成数组:
        function check(node) {
            if (
                node.arguments.length !== 1 &&
                node.callee.type === "Identifier" &&
                node.callee.name === "Array"
            ) {
                context.report({ node, messageId: "preferLiteral" });
            }
        }

        return {
            CallExpression: check,
            NewExpression: check
        };
不许给类定义赋值:
    create(context) {
        function checkVariable(variable) {
            astUtils.getModifyingReferences(variable.references).forEach(reference => {
                context.report({ node: reference.identifier, messageId: "class", data: { name: reference.identifier.name } });

            });
        }

        function checkForClass(node) {
            context.getDeclaredVariables(node).forEach(checkVariable);
        }

        return {
            ClassDeclaration: checkForClass,
            ClassExpression: checkForClass
        };

    }
函数的参数不允许重名:
    create(context) {

        function isParameter(def) {
            return def.type === "Parameter";
        }

        function checkParams(node) {
            const variables = context.getDeclaredVariables(node);

            for (let i = 0; i < variables.length;   i) {
                const variable = variables[i];

                const defs = variable.defs.filter(isParameter);

                if (defs.length >= 2) {
                    context.report({
                        node,
                        messageId: "unexpected",
                        data: { name: variable.name }
                    });
                }
            }
        }

        return {
            FunctionDeclaration: checkParams,
            FunctionExpression: checkParams
        };

    }
如果事件太多的话,可以写成一个数组,这被称为选择器数组:
const allLoopTypes = ["WhileStatement", "DoWhileStatement", "ForStatement", "ForInStatement", "ForOfStatement"];
...
                        [loopSelector](node) {
                if (currentCodePath.currentSegments.some(segment => segment.reachable)) {
                    loopsToReport.add(node);
                }
            },
除了直接处理语句类型,还可以针对类型加上一些额外的判断。
比如不允许使用delete运算符:
    create(context) {

        return {

            UnaryExpression(node) {
                if (node.operator === "delete" && node.argument.type === "Identifier") {
                    context.report({ node, messageId: "unexpected" });
                }
            }
        };

    }
不准使用"=="和"!="运算符:
    create(context) {

        return {

            BinaryExpression(node) {
                const badOperator = node.operator === "==" || node.operator === "!=";

                if (node.right.type === "Literal" && node.right.raw === "null" && badOperator ||
                        node.left.type === "Literal" && node.left.raw === "null" && badOperator) {
                    context.report({ node, messageId: "unexpected" });
                }
            }
        };

    }
不许和-0进行比较:
    create(context) {

        function isNegZero(node) {
            return node.type === "UnaryExpression" && node.operator === "-" && node.argument.type === "Literal" && node.argument.value === 0;
        }
        const OPERATORS_TO_CHECK = new Set([">", ">=", "<", "<=", "==", "===", "!=", "!=="]);

        return {
            BinaryExpression(node) {
                if (OPERATORS_TO_CHECK.has(node.operator)) {
                    if (isNegZero(node.left) || isNegZero(node.right)) {
                        context.report({
                            node,
                            messageId: "unexpected",
                            data: { operator: node.operator }
                        });
                    }
                }
            }
        };
    }
不准给常量赋值:
3 :exit - 语句结束事件
create(context) { function checkVariable(variable) { astUtils.getModifyingReferences(variable.references).forEach(reference => { context.report({ node: reference.identifier, messageId: "const", data: { name: reference.identifier.name } }); }); } return { VariableDeclaration(node) { if (node.kind === "const") { context.getDeclaredVariables(node).forEach(checkVariable); } } }; }除了语句事件之外,eslint还提供了:exit事件。
比如上面的例子我们使用了VariableDeclaration语句事件,我们下面看看如何使用VariableDeclaration结束时调用的VariableDeclaration:exit事件。
我们看一个不允许使用var定义变量的例子:
        return {
            "VariableDeclaration:exit"(node) {
                if (node.kind === "var") {
                    report(node);
                }
            }
        };
如果觉得进入和退出不好区分的话,我们来看一个不允许在非函数的块中使用var来定义变量的例子:
            BlockStatement: enterScope,
            "BlockStatement:exit": exitScope,
            ForStatement: enterScope,
            "ForStatement:exit": exitScope,
            ForInStatement: enterScope,
            "ForInStatement:exit": exitScope,
            ForOfStatement: enterScope,
            "ForOfStatement:exit": exitScope,
            SwitchStatement: enterScope,
            "SwitchStatement:exit": exitScope,
            CatchClause: enterScope,
            "CatchClause:exit": exitScope,
            StaticBlock: enterScope,
            "StaticBlock:exit": exitScope,
这些逻辑的作用是,进入语句块的时候调用enterScope,退出语句块的时候调用exitScope:
4 直接使用文字信息 - Literal
function enterScope(node) { stack.push(node.range); } function exitScope() { stack.pop(); }比如不允许使用"-.7"这样省略了0的浮点数。此时使用Literal来处理纯文字信息。
    create(context) {
        const sourceCode = context.getSourceCode();

        return {
            Literal(node) {

                if (typeof node.value === "number") {
                    if (node.raw.startsWith(".")) {
                        context.report({
                            node,
                            messageId: "leading",
                            fix(fixer) {
                                const tokenBefore = sourceCode.getTokenBefore(node);
                                const needsSpaceBefore = tokenBefore &&
                                    tokenBefore.range[1] === node.range[0] &&
                                    !astUtils.canTokensBeAdjacent(tokenBefore, `0${node.raw}`);

                                return fixer.insertTextBefore(node, needsSpaceBefore ? " 0" : "0");
                            }
                        });
                    }
                    if (node.raw.indexOf(".") === node.raw.length - 1) {
                        context.report({
                            node,
                            messageId: "trailing",
                            fix: fixer => fixer.insertTextAfter(node, "0")
                        });
                    }
                }
            }
        };
    }
不准使用八进制数字:
三 代码路径分析
create(context) { return { Literal(node) { if (typeof node.value === "number" && /^0[0-9]/u.test(node.raw)) { context.report({ node, messageId: "noOcatal" }); } } }; }前面我们讨论的基本都是一个代码片段,现在我们把代码逻辑串起来,形成一条代码路径。
代码路径就不止只有顺序结构,还有分支和循环。
除了采用上面的事件处理方法之外,我们还可以针对CodePath事件进行处理:
事件onCodePathStart和onCodePathEnd用于整个路径的分析,而onCodePathSegmentStart, onCodePathSegmentEnd是CodePath中的一个片段,onCodePathSegmentLoop是循环片段。
我们来看一个循环的例子:
四 提供问题自动修复的代码
create(context) { const ignoredLoopTypes = context.options[0] && context.options[0].ignore || [], loopTypesToCheck = getDifference(allLoopTypes, ignoredLoopTypes), loopSelector = loopTypesToCheck.join(","), loopsByTargetSegments = new Map(), loopsToReport = new Set(); let currentCodePath = null; return { onCodePathStart(codePath) { currentCodePath = codePath; }, onCodePathEnd() { currentCodePath = currentCodePath.upper; }, [loopSelector](node) { if (currentCodePath.currentSegments.some(segment => segment.reachable)) { loopsToReport.add(node); } }, onCodePathSegmentStart(segment, node) { if (isLoopingTarget(node)) { const loop = node.parent; loopsByTargetSegments.set(segment, loop); } }, onCodePathSegmentLoop(_, toSegment, node) { const loop = loopsByTargetSegments.get(toSegment); if (node === loop || node.type === "ContinueStatement") { loopsToReport.delete(loop); } }, "Program:exit"() { loopsToReport.forEach( node => context.report({ node, messageId: "invalid" }) ); } }; }最后,我们讲讲如何给问题给供自动修复代码。
我们之前报告问题都是使用context.report函数,自动修复代码也是通过这个接口返回给调用者。
我们以将"=="和"!="替换成"==="和"!=="为例。
这个fix没有多少技术含量哈,就是给原来发现问题的运算符多加一个"=":
report(node, `${node.operator}=`);最终实现时是调用了fixer的replaceText函数:
                fix(fixer) {
                    if (isTypeOfBinary(node) || areLiteralsAndSameType(node)) {
                        return fixer.replaceText(operatorToken, expectedOperator);
                    }
                    return null;
                }
完整的report代码如下:
        function report(node, expectedOperator) {
            const operatorToken = sourceCode.getFirstTokenBetween(
                node.left,
                node.right,
                token => token.value === node.operator
            );

            context.report({
                node,
                loc: operatorToken.loc,
                messageId: "unexpected",
                data: { expectedOperator, actualOperator: node.operator },
                fix(fixer) {
                    if (isTypeOfBinary(node) || areLiteralsAndSameType(node)) {
                        return fixer.replaceText(operatorToken, expectedOperator);
                    }
                    return null;
                }
            });
        }
Fixer支持4个添加API,2个删除API,2个替换类的API:
五 高级话题1 React JSX的支持
Facebook给我们封装好了框架,写起来也是蛮眼熟的。刚好之前没有举markVariableAsUsed的例子,正好一起看了:
module.exports = {
  meta: {
    docs: {
      description: 'Prevent React to be marked as unused',
      category: 'Best Practices',
      recommended: true,
      url: docsUrl('jsx-uses-react'),
    },
    schema: [],
  },

  create(context) {
    const pragma = pragmaUtil.getFromContext(context);
    const fragment = pragmaUtil.getFragmentFromContext(context);

    function handleOpeningElement() {
      context.markVariableAsUsed(pragma);
    }

    return {
      JSXOpeningElement: handleOpeningElement,
      JSXOpeningFragment: handleOpeningElement,
      JSXFragment() {
        context.markVariableAsUsed(fragment);
      },
    };
  },
};
JSX的特殊之处是增加了JSXOpenElement, JSXClosingElement, JSXOpenFragment, JSXClosingFragment等处理JSX的事件。
2 TypeScript的支持随着tslint合并到eslint中,TypeScript的lint功能由typescript-eslint承载。
因为estree只支持javascript,typescript-eslint提供兼容estree格式的parser.
既然是ts的lint,自然是拥有了ts的支持,拥有了新的工具方法,其基本架构仍是和eslint一致的:
3 更换ESLint的AST解析器
import * as ts from 'typescript'; import * as util from '../util'; export default util.createRule({ name: 'no-for-in-array', meta: { docs: { description: 'Disallow iterating over an array with a for-in loop', recommended: 'error', requiresTypeChecking: true, }, messages: { forInViolation: 'For-in loops over arrays are forbidden. Use for-of or array.forEach instead.', }, schema: [], type: 'problem', }, defaultOptions: [], create(context) { return { ForInStatement(node): void { const parserServices = util.getParserServices(context); const checker = parserServices.program.getTypeChecker(); const originalNode = parserServices.esTreeNodeToTSNodeMap.get(node); const type = util.getConstrainedTypeAtLocation( checker, originalNode.expression, ); if ( util.isTypeArrayTypeOrUnionOfArrayTypes(type, checker) || (type.flags & ts.TypeFlags.StringLike) !== 0 ) { context.report({ node, messageId: 'forInViolation', }); } }, }; }, });ESLint支持使用第三方AST解析器,刚好Babel也支持ESLint,于是我们就可以用@babel/eslint-parser来替换espree. 装好插件之后,修改.eslintrc.js即可:
module.exports = {
  parser: "@babel/eslint-parser",
};
Babel自带支持TypeScript。
六 StyleLint说完了Eslint,我们再花一小点篇幅看下StyleLint。
StyleLint与Eslint的架构思想一脉相承,都是对于AST的事件分析进行处理的工具。
只不过css使用不同的AST Parser,比如Post CSS API, postcss-value-parser, postcss-selector-parser等。
我们来看个例子体感一下:
const rule = (primary) => {
    return (root, result) => {
        const validOptions = validateOptions(result, ruleName, { actual: primary });

        if (!validOptions) {
            return;
        }

        root.walkDecls((decl) => {
            const parsedValue = valueParser(getDeclarationValue(decl));

            parsedValue.walk((node) => {
                if (isIgnoredFunction(node)) return false;

                if (!isHexColor(node)) return;

                report({
                    message: messages.rejected(node.value),
                    node: decl,
                    index: declarationValueIndex(decl)   node.sourceIndex,
                    result,
                    ruleName,
                });
            });
        });
    };
};
也是熟悉的report函数回报,也可以支持autofix的生成。
七 小结以上,我们基本将eslint规则写法的大致框架梳理清楚了。当然,实际写规刚的过程中还需要对于AST以及语言细节有比较深的了解。预祝大家通过写出适合自己业务的检查器,写出更健壮的代码。
自己动手写符合自己业务需求的eslint规则
点击链接查看原文,关注公众号【阿里技术】获取更多福利!
,


免责声明:本文仅代表文章作者的个人观点,与本站无关。其原创性、真实性以及文中陈述文字和内容未经本站证实,对本文以及其中全部或者部分内容文字的真实性、完整性和原创性本站不作任何保证或承诺,请读者仅作参考,并自行核实相关内容。文章投诉邮箱:anhduc.ph@yahoo.com