视觉机器人vlog功能模块(快速上手Dialogflow交互机器人)
作者:MeshCloud脉时云公有云架构师陈博文
简介:Dialogflow 是Google 提供的一款人机交互平台,通过该平台可以轻松地设计出属于自己的交互机器人,比如常见的网页聊天机器人,电话智能客服等。借助Dialogflow甚至可以用于扫地机器人交互系统或者更高级的使用。
Dialogflow 通过客户输入的语音或者文字甚至情感分析,来识别客户的意图(Intens),结合实体(Entities),来进行相应的回复。
Dialogflow的几个优点:
- 识别准确率高,响应速度快
- 支持 30 多种语言和语言变体
- 上手简单:图形界面配置;官方文档丰富、详细;网络上有案例可供参考
- 有问题易解决:开发者社区超过150万名开发者
一、马航的订票查票机器人:

使用 Google Cloud 上的 Dialogflow,马来西亚航空公司和 Amadeus 创建了一个聊天机器人,使客户能够搜索、预订和支付航班,从而使航空公司能够满足未来的需求并增加数字渠道的收入。
二、达美乐披萨的订餐机器人:


三、KLM预定、打包机器人:

KLM 于 2016 年开始探索为客户提供体验的方法。他们在测试多个平台后选择了 Dialogflow。
常用工具一、内置 Small Talk
Small Talk 用于为闲聊对话提供响应。 此功能可以解答代理范围之外的常见问题,极大地提升最终用户体验。
Small Talk 有两种版本:
- 内置 Small Talk:为代理启用 Small Talk 后,它会自动处理闲聊对话,无需向代理添加意图。
- 预建 Small Talk:导入预建 Small Talk 代理时,它会提供处理闲聊对话的意图。
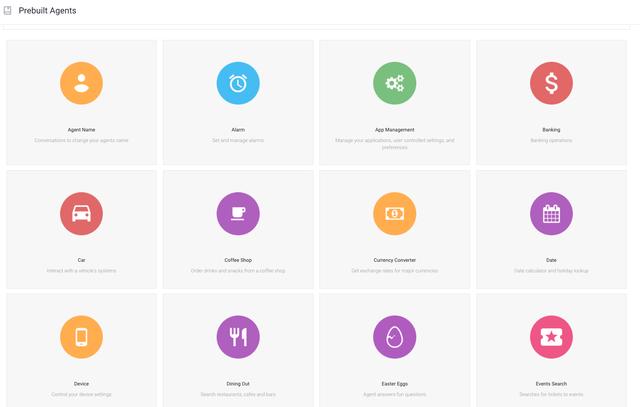
二、prebuilt agent
由 Dialogflow 提供的一组代理,适用于常见的使用场景。 您可以这些代理为基础,构建涵盖特定场景(如外出就餐、酒店预订和导航)的对话。
由 Dialogflow 提供的一组代理,适用于常见的使用场景。 您可以这些代理为基础,构建涵盖特定场景(如外出就餐、酒店预订和导航)的对话。
如何制作一个自己的天气&新闻语音问答机器人使用了文字输入Dialogflow 的方式
通过speech-to-text将音频麦克风流到Dialogflow 的文本意图检测API
案例使用了以下GCP产品:
- Dialogflow ES & Knowledge Bases
- Speech to Text
其它组件:
- Webhook
- Weathers & News API
在这个demo中你可以使用麦克风输入,然后返回新闻或者天气

一、Dialogflow ES(页面配置)
1、意图配置
①配置输入

②配置回复

2、Webhook配置
①意图开启Fulfillment

②添加webhook

③webhook代码
import Requests
#新闻接口
from newsapi import NewsApiClient
import time
import json
#使用了Flask框架
from flask import Flask, request
import pycountry
#from gevent.pywsgi import WSGIServer

app = Flask(__name__)

@app.route('/webhook', methods=['POST'])
def webhook():
    Dialogflow_data = json.loads(request.data)
    intent =Dialogflow_data["queryResult"]["intent"]["displayName"]
    print("--------------------------------------")
    if intent == "news":
        responseText = callnewsapi()
        news = responseText["articles"][0]["title"]
        print(news)
        headline = " headline news is %s"%(news)
        #需要按要求返回dialogflow才能回复给客户端
        #"fulfillmentText"是客户端接收消息
        res = {"fulfillmentText": headline ,"fulfillmentMessages": [{"text": {"text":[headline]}}]}
        return(res)
    elif intent == "weather":
        CITY=Dialogflow_data["queryResult"]["parameters"]["geo-city"]
        key = '479284d0d8574437b8170935221508'
        responseText = json.loads(callweatherapi(key,CITY))
        mintemp = responseText["data"]["ClimateAverages"][0]["month"][7]["avgMinTemp"]
        maxtemp = responseText["data"]["ClimateAverages"][0]["month"][7]["absMaxTemp"]
        tempres = "London Maxtemp is %s ℃ Mintempe is %s ℃"%(maxtemp,mintemp)
        #需要按要求返回dialogflow才能回复给客户端
        #"fulfillmentText"是客户端接收消息
        res = {"fulfillmentText": tempres ,"fulfillmentMessages": [{"text": {"text":[tempres]}}]}
        return(res)


def callweatherapi(key,CITY):
    time.sleep(0.01)
    response = requests.post("http://api.worldweatheronline.com/premium/v1/weather.ashx?key=%s&q=%s&fx=no&cc=no&mca=yes&format=json"%(key,CITY))
    if response.status_code == 200:
       return(response.text)

def callnewsapi():
    newsapi = NewsApiClient(api_key='0eaad3923a654da2a2a32d84870e0405')
    response = newsapi.get_top_headlines(language='es')
    return(response)

if __name__ == '__main__':
    #WSGIServer(('0.0.0.0', 5000), app).serve_forever()
    app.run(host="0.0.0.0", port=5000, ssl_context=('/root/scs1660552637313_cbw404.cn/scs1660552637313_cbw404.cn_Nginx/scs1660552637313_cbw404.cn_server.crt', '/root/scs1660552637313_cbw404.cn/scs1660552637313_cbw404.cn_Nginx/scs1660552637313_cbw404.cn_server.key'))
新闻接口:
http://api.worldweatheronline.com/premium/v1/weather.ashx?key=apikey&q=city&fx=no&cc=no&mca=yes&format=json
天气接口:
#install
pip install newsapi-python
#usage
from newsapi import NewsApiClient
#init
newsapi = NewsApiClient(api_key='API_KEY')\
# /v2/top-headlines
top_headlines = newsapi.get_top_headlines(q='bitcoin',
                                          sources='bbc-news,the-verge',
                                          category='business',
                                          language='en',
                                          country='us')
# /v2/everything
all_articles = newsapi.get_everything(q='bitcoin',
                                      sources='bbc-news,the-verge',
                                      domains='bbc.co.uk,techcrunch.com',
                                      from_param='2017-12-01',
                                      to='2017-12-12',
                                      language='en',
                                      sort_by='relevancy',
                                      page=2)
# /v2/top-headlines/sources
sources = newsapi.get_sources()
二、Speech-to-text(后面简称stt) to Dialogflow
1、准备工作
①权限配置
下载service account json格式

Linux:
配置环境变量 export GOOGLE_APPLICATION_CREDENTIALS=<json path>
<json path> 为1中下载的 sa 的json文件

Windows:
set GOOGLE_APPLICATION_CREDENTIALS=C:\Users\Administrator\Downloads\sa.json
②python包
python 包
google-cloud-speech
pyaudio
google-cloud-dialogflow
python-dotenv
uuid
③.env文件 用于读取配置
PROJECT_ID=<project-id>
#这里做的西班牙语测试
LANGUAGE_CODE=es
#语音的一些参数设置,保持默认
ENCODING=AUDIO_ENCODING_LINEAR_16
SAMPLE_RATE_HERZ=16000
SINGLE_UTTERANCE=false
SPEECH_ENCODING=LINEAR16
SSML_GENDER=FEMALE
#dialogflow的区域(有us,es,zh)
LOCATION_ID=global
2、Speech-to-text
使用实时流式音频执行识别(transcribe_streaming_mic),也就是麦克风持续输入,代码如下:
#!/usr/bin/env python

"""Google Cloud Speech API sample application using the streaming API.
NOTE: This module requires the additional dependency `pyaudio`. To install
using pip:
    pip install pyaudio
Example usage:
    python transcribe_streaming_mic.py
"""

from __future__ import division

import re
import sys

from google.cloud import speech

import pyaudio
from six.moves import queue


RATE = 16000
CHUNK = int(RATE / 10)  # 100ms


class MicrophoneStream(object):
    """Opens a recording stream as a generator yielding the audio chunks."""

    def __init__(self, rate, chunk):
        self._rate = rate
        self._chunk = chunk


        self._buff = queue.Queue()
        self.closed = True

    def __enter__(self):
        self._audio_interface = pyaudio.PyAudio()
        self._audio_stream = self._audio_interface.open(
            format=pyaudio.paInt16,

            channels=1,
            rate=self._rate,
            input=True,
            frames_per_buffer=self._chunk,
            stream_callback=self._fill_buffer,
        )

        self.closed = False

        return self

    def __exit__(self, type, value, traceback):
        self._audio_stream.stop_stream()
        self._audio_stream.close()
        self.closed = True
        self._buff.put(None)
        self._audio_interface.terminate()

    def _fill_buffer(self, in_data, frame_count, time_info, status_flags):
        """Continuously collect data from the audio stream, into the buffer."""
        self._buff.put(in_data)
        return None, pyaudio.paContinue

    def generator(self):
        while not self.closed:
            chunk = self._buff.get()
            if chunk is None:
                return
            data = [chunk]
            while True:
                try:
                    chunk = self._buff.get(block=False)
                    if chunk is None:
                        return
                    data.append(chunk)
                except queue.Empty:
                    break

            yield b"".join(data)


def listen_print_loop(responses):
    num_chars_printed = 0
    for response in responses:
        if not response.results:
            continue

        result = response.results[0]
        if not result.alternatives:
            continue

        transcript = result.alternatives[0].transcript

        overwrite_chars = " " * (num_chars_printed - len(transcript))

        if not result.is_final:
            sys.stdout.write(transcript   overwrite_chars   "\r")
            sys.stdout.flush()

            num_chars_printed = len(transcript)

        else:
            print(transcript   overwrite_chars)

            if re.search(r"\b(exit|quit)\b", transcript, re.I):
                print("Exiting..")
                break

            num_chars_printed = 0


def main():

    language_code = "en-US"  #  BCP-47

    client = speech.SpeechClient()
    config = speech.RecognitionConfig(
        encoding=speech.RecognitionConfig.AudioEncoding.LINEAR16,
        sample_rate_hertz=RATE,
        language_code=language_code,
    )

    streaming_config = speech.StreamingRecognitionConfig(
        config=config, interim_results=True
    )

    with MicrophoneStream(RATE, CHUNK) as stream:
        audio_generator = stream.generator()
        requests = (
            speech.StreamingRecognizeRequest(audio_content=content)
            for content in audio_generator
        )

        responses = client.streaming_recognize(streaming_config, requests)

        # Now, put the transcription responses to use.
        listen_print_loop(responses)


if __name__ == "__main__":
    main()
3、Dialogflow
调用检测意图,代码如下:
#!/usr/bin/env python

"""DialogFlow API Detect Intent Python sample to use regional endpoint.
Examples:
  python detect_intent_texts_with_location.py -h
  python detect_intent_texts_with_location.py --project-id PROJECT_ID \
  --location-id LOCATION_ID --session-id session_ID \
  "hello" "book a meeting room" "Mountain View"
"""

import argparse
import uuid


def detect_intent_texts_with_location(
    project_id, location_id, session_id, texts, language_code
):

    from google.cloud import dialogflow

    session_client = dialogflow.SessionsClient(
        client_options={"api_endpoint": f"{location_id}-dialogflow.googleapis.com"}
    )

    session = (
        f"projects/{project_id}/locations/{location_id}/agent/sessions/{session_id}"
    )
    print(f"Session path: {session}\n")

    text_input = dialogflow.TextInput(text=texts, language_code=language_code)

    query_input = dialogflow.QueryInput(text=text_input)

    response = session_client.detect_intent(
        request={"session": session, "query_input": query_input}
    )

    print("=" * 20)
    print(f"Query text: {response.query_result.query_text}")
    print(
        f"Detected intent: {response.query_result.intent.display_name} (confidence: {response.query_result.intent_detection_confidence,})\n"
    )
    print(f"Fulfillment text: {response.query_result.fulfillment_text}\n")


if __name__ == "__main__":
    parser = argparse.ArgumentParser(
        description=__doc__, formatter_class=argparse.RawDescriptionHelpFormatter
    )
    parser.add_argument(
        "--project-id", help="Project/agent id.  Required.", required=True
    )
    parser.add_argument("--location-id", help="Location id.  Required.", required=True)
    parser.add_argument(
        "--session-id",
        help="Identifier of the DetectIntent session. " "Defaults to a random UUID.",
        default=str(uuid.uuid4()),
    )
    parser.add_argument(
        "--language-code",
        help='Language code of the query. Defaults to "en-US".',
        default="en-US",
    )
    parser.add_argument("texts", nargs=" ", type=str, help="Text inputs.")

    args = parser.parse_args()

    detect_intent_texts_with_location(
        args.project_id,
        args.location_id,
        args.session_id,
        args.texts,
        args.language_code,
    )
4、(主要代码)将stt的结果(文字)输出到Dialogflow 意图检测,Dialogflow作出回复
流程:

#!/usr/bin/env python

"""Google Cloud Speech API sample application using the streaming API.
NOTE: This module requires the additional dependency `pyaudio`. To install
using pip:
    pip install pyaudio
Example usage:
    python transcribe_streaming_mic.py
"""

from __future__ import division

import re
import sys

from google.cloud import speech

import pyaudio
from six.moves import queue
import os
import uuid
#调用 Dialogflow意图检测包(代码见2.dialogflow)
from detect_intent_texts_with_location import detect_intent_texts_with_location
from dotenv import load_dotenv

RATE = 16000
CHUNK = int(RATE / 10)  # 100ms


class MicrophoneStream(object):
    """Opens a recording stream as a generator yielding the audio chunks."""

    def __init__(self, rate, chunk):
        self._rate = rate
        self._chunk = chunk


        self._buff = queue.Queue()
        self.closed = True

    def __enter__(self):
        self._audio_interface = pyaudio.PyAudio()
        self._audio_stream = self._audio_interface.open(
            format=pyaudio.paInt16,
            channels=1,
            rate=self._rate,
            input=True,
            frames_per_buffer=self._chunk,
            stream_callback=self._fill_buffer,
        )

        self.closed = False

        return self

    def __exit__(self, type, value, traceback):
        self._audio_stream.stop_stream()
        self._audio_stream.close()
        self.closed = True
        self._buff.put(None)
        self._audio_interface.terminate()

    def _fill_buffer(self, in_data, frame_count, time_info, status_flags):
        """Continuously collect data from the audio stream, into the buffer."""
        self._buff.put(in_data)
        return None, pyaudio.paContinue

    def generator(self):
        while not self.closed:
            chunk = self._buff.get()
            if chunk is None:
                return
            data = [chunk]
            while True:
                try:
                    chunk = self._buff.get(block=False)
                    if chunk is None:
                        return
                    data.append(chunk)
                except queue.Empty:
                    break

            yield b"".join(data)


def listen_print_loop(responses):

    load_dotenv(verbose=True)
    num_chars_printed = 0
    for response in responses:
        if not response.results:
            continue


        result = response.results[0]
        if not result.alternatives:
            continue

        transcript = result.alternatives[0].transcript

        overwrite_chars = " " * (num_chars_printed - len(transcript))

        if not result.is_final:
            sys.stdout.write(transcript   overwrite_chars   "\r")
            sys.stdout.flush()

            num_chars_printed = len(transcript)

        else:
        #从.env中导出Project_id等配置,可以通过修改.env修改
            TEXT=transcript   overwrite_chars
            print(transcript   overwrite_chars)
            PROJECT_ID = os.getenv("PROJECT_ID")
            SESSION_ID = uuid.uuid1()
            LANGUAGE_CODE = os.getenv("LANGUAGE_CODE")
        #Location_ID
            LOCATION_ID = os.getenv("LOCATION_ID")
        #意图检测 TEXT为mic接收到的语音转成的文字(代码见2.dialogflow)
            detect_intent_texts_with_location(PROJECT_ID, LOCATION_ID, SESSION_ID, TEXT, LANGUAGE_CODE)
            # Exit recognition if any of the transcribed phrases could be
            # one of our keywords.
            #对麦克风说exit即可退出
            if re.search(r"\b(exit|quit)\b", transcript, re.I):
                print("Exiting..")
                break

            num_chars_printed = 0


def main():
    language_code = "en-US"  # BCP-47
    client = speech.SpeechClient()
    config = speech.RecognitionConfig(
        encoding=speech.RecognitionConfig.AudioEncoding.LINEAR16,
        sample_rate_hertz=RATE,
        language_code=language_code,
    )

    streaming_config = speech.StreamingRecognitionConfig(
        config=config, interim_results=True
    )

    with MicrophoneStream(RATE, CHUNK) as stream:
        audio_generator = stream.generator()
        requests = (
            speech.StreamingRecognizeRequest(audio_content=content)
            for content in audio_generator
        )

        responses = client.streaming_recognize(streaming_config, requests)


        listen_print_loop(responses)

if __name__ == "__main__":
    main()
Location_id:(上面意图检测API的location_id参数)
|
国家/地区分组 |
地理位置 |
地区 ID |
|
美洲 |
爱荷华 |
us-central1 |
|
美洲 |
蒙特利尔 |
northamerica-northeast1 |
|
美洲 |
南卡罗来纳 |
us-east1 |
|
美洲 |
俄勒冈 |
us-west1 |
|
欧洲 |
比利时 |
europe-west1 |
|
欧洲 |
伦敦 |
europe-west2 |
|
欧洲 |
法兰克福 |
europe-west3 |
|
亚太地区 |
悉尼 |
australia-southeast1 |
|
亚太地区 |
东京 |
asia-northeast1 |
|
亚太地区 |
孟买 |
asia-south1 |
|
亚太地区 |
新加坡 |
asia-southeast1 |
|
全球 |
全球服务,静态数据在美国 |
global(首选)、us 或无区域(默认) |
5、测试
①Dialogflow web测试:Fulfillment 通过 webhook response 格式化数据后返回给客户端 ,测试成功

②程测试:mic -- stt -- dialogflow --client(default welcome intent --default response)
测试成功:

可以看到语音输入的内容转成了文字,并发送给了dialogflow的意图检测,并匹配意图给出相应的回复
③全流程测试:mic -- stt -- dialogflow -- fulfillment -- webhook -- api -- client
对麦克风说:noticias(西语新闻)
返回:头条新闻的标题,测试成功

三、总结
至此,一个天气&新闻语音问答机器人就做好了
官方还提供了另外的集成或者使用方式,可以供大家参考学习。希望这篇文章对大家有抛砖引玉的作用,以便大家能做出更高级更智能、更符合自己项目的交互机器人
,免责声明:本文仅代表文章作者的个人观点,与本站无关。其原创性、真实性以及文中陈述文字和内容未经本站证实,对本文以及其中全部或者部分内容文字的真实性、完整性和原创性本站不作任何保证或承诺,请读者仅作参考,并自行核实相关内容。文章投诉邮箱:anhduc.ph@yahoo.com


