linux运维工作常见问题(Linux运维学习笔记之权限设置)
继上节的内容,在了解了目录的知识点后,我们再来了解一下权限。这个在运维的工作当中,很多时候的命令出错或是执行出错,很多是由于对权限的不了解导致的。很多熟悉Windws的运维,因为windows下的用户在创建的时候,默认都是带有管理员的功能。而liunx的用户默认情况下是有自己的组与权限。都不是有ROOT的用户权限。
要想了解文件的权限,首先要知道现有的文件/文件夹有哪些权限。要了解如何去查看文件/文件夹的权限,也就是先看懂下图的内容:
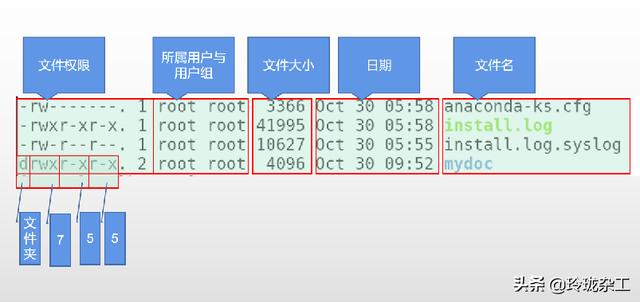
ll命令下文件的解读
如何去查看权限、修改权限呢?本节相关的命令包含
ls/ll(列出目录详情)
chmod(修改文件/文件夹权限)
chown(修改文件/文件夹所属用户及用户组)
一、查看权限
[root@localhost ~]# ll
total 64
-rw-------. 1 root root  3366 Oct 30 05:58 anaconda-ks.cfg
-rw-r--r--. 1 root root 41995 Oct 30 05:58 install.log
-rw-r--r--. 1 root root 10627 Oct 30 05:55 install.log.syslog
drwx------. 25 telty telty 4096 Oct 30 08:20 telty
大家看上面的命令列出的,对比一下上面的图片信息,就可以知道文件前面有"-rw-r--r--"10个字符的字符串。具体解读如下:
用户权限,使用10个字符来表现,分成四组信息
第一个字符单独为一组,“-”或“d” 代表文件类型,-表示文件,d表示目录(directory)
后面9个字符则分成3组(“rw-”与“r--”与“r--”)进行解读,分别是所属用户权限、所属用户组权限、其它用户权限。
这一组信息的每一个字符都 有它自己的特定含义且位置是固定不变的,其中:
r是读权限,对应数值为4
w是写权限,对应数值为2
x是可执行权限,对应数值为1
“-”是没有权限,对应数值为0
因此可以知道“rw-”的数值为6(4 2 0),“r--”的数值为4(4 0 0),最后一组亦是4
然后三组数值组成数值644,因此install.log.syslog文件的权限为root用户组的root用户。
了解了以上的内容,那我们就可以对文件进行修改了。
二、修改权限
1、修改文件的权限,使用命令chmod
[root@localhost ~]# ll
total 64
-rw-------. 1 root root  3366 Oct 30 05:58 anaconda-ks.cfg     #权限值600
-rw-r--r--. 1 root root 41995 Oct 30 05:58 install.log                #权限值644
-rw-r--r--. 1 root root 10627 Oct 30 05:55 install.log.syslog     #权限值644
命令用法:chmod 权限值 文件名
[root@localhost ~]# chmod 755 install.log
[root@localhost ~]# ll
total 64
-rw-------. 1 root root  3366 Oct 30 05:58 anaconda-ks.cfg
-rwxr-xr-x. 1 root root 41995 Oct 30 05:58 install.log                   #权限值已变755
-rw-r--r--. 1 root root 10627 Oct 30 05:55 install.log.syslog
至此,完成文件的权限修改,而文件夹权限修改类似,如下例子:
[root@localhost ~]# ll
total 68
-rw-------. 1 root root  3366 Oct 30 05:58 anaconda-ks.cfg
-rwxr-xr-x. 1 root root 41995 Oct 30 05:58 install.log
-rw-r--r--. 1 root root 10627 Oct 30 05:55 install.log.syslog
drwxr-xr-x. 2 root root  4096 Oct 30 09:52 mydoc                    #修改前为755权限
[root@localhost ~]#
[root@localhost ~]# chmod 644 mydoc/
[root@localhost ~]# ll
total 68
-rw-------. 1 root root  3366 Oct 30 05:58 anaconda-ks.cfg
-rwxr-xr-x. 1 root root 41995 Oct 30 05:58 install.log
-rw-r--r--. 1 root root 10627 Oct 30 05:55 install.log.syslog
drw-r--r--. 2 root root  4096 Oct 30 09:52 mydoc                   #修改后为644权限
2、修改用户与用户组的权限,使用命令chown
命令用法:chown 用户:用户组 文件名
[root@localhost ~]# ll
total 68
-rw-------. 1 root root  3366 Oct 30 05:58 anaconda-ks.cfg
-rwxr-xr-x. 1 root root 41995 Oct 30 05:58 install.log                 #修改前所属用户与用户组
-rw-r--r--. 1 root root 10627 Oct 30 05:55 install.log.syslog
drw-r--r--. 2 root root  4096 Oct 30 09:52 mydoc
[root@localhost ~]#
[root@localhost ~]# chown telty:root install.log                          #使用chown命令
[root@localhost ~]# ll
total 68
-rw-------. 1 root  root  3366 Oct 30 05:58 anaconda-ks.cfg
-rwxr-xr-x. 1 telty root 41995 Oct 30 05:58 install.log                   #修改后所属用户与用户组
-rw-r--r--. 1 root  root 10627 Oct 30 05:55 install.log.syslog
drw-r--r--. 2 root  root  4096 Oct 30 09:52 mydoc
至此,文件的所属用户与用户名修改完成,文件夹类似
[root@localhost ~]# ll
total 68
-rw-------. 1 root  root  3366 Oct 30 05:58 anaconda-ks.cfg
-rwxr-xr-x. 1 telty root 41995 Oct 30 05:58 install.log
-rw-r--r--. 1 root  root 10627 Oct 30 05:55 install.log.syslog
drw-r--r--. 2 root  root  4096 Oct 30 09:52 mydoc                       #修改前所属用户与用户组
[root@localhost ~]#
[root@localhost ~]# chown telty:telty mydoc/
[root@localhost ~]# ll
total 68
-rw-------. 1 root  root   3366 Oct 30 05:58 anaconda-ks.cfg
-rwxr-xr-x. 1 telty root  41995 Oct 30 05:58 install.log
-rw-r--r--. 1 root  root  10627 Oct 30 05:55 install.log.syslog
drw-r--r--. 2 telty telty  4096 Oct 30 09:52 mydoc                      #修改后所属用户与用户组
另外 ,文件夹下还有文件夹多层文件夹的,又或者说要修改文件夹里的全部文件,则需要加上 -R 参数,
比如:
[root@localhost ~]# chown -R telty:telty mydoc/
[root@localhost ~]# chmod -R telty:telty mydoc/
以上就是针对文件的权限进行操作的学习了,你学会了么?
,免责声明:本文仅代表文章作者的个人观点,与本站无关。其原创性、真实性以及文中陈述文字和内容未经本站证实,对本文以及其中全部或者部分内容文字的真实性、完整性和原创性本站不作任何保证或承诺,请读者仅作参考,并自行核实相关内容。文章投诉邮箱:anhduc.ph@yahoo.com


