python 动态识别人脸(赠书Python人脸五官姿态检测)


作者 | 李秋键
出品 | AI科技大本营
近几个月来由于疫情的影响使得网络授课得到了快速的发展,人工智能作为最有潜力的发展行业,同样可以应用于网络授课的监督。比如通过检测人脸姿态,眼睛是否张开,鼻子嘴巴等特征,来达到监测专注度等情绪特征。故本文主要是基于Github项目搭建pytorch项目实现人脸姿态监测。
此源码地址:
https://github.com/WIKI2020/FacePose_pytorch
*文末有赠书福利
并且该算法已应用于以下两种产品:儿童在线教育,用于识别儿童是否认真听讲;现场会议或学校教室,以判断演讲质量。
人脸检测是指从复杂的背景当中提取我们感兴趣的人脸图像。脸部毛发、化妆品、光照、噪声、人脸倾斜和大小变化及各种遮挡等因素都会有导致人脸检测问题变得更为复杂。人脸识别技术主要目的在于输入的整幅图像上寻找特定人脸区域,从而为后续的人脸识别做准备。其中三大关键技术:基于特征的人脸检测技术;基于模板匹配人脸检测技术;基于统计的人脸检测技术
一般常用的算法特点如下:
1、Dlib:面部关键点识别不准确,旋转或滚动面部时误差很大。
2、虚拟3D模型:将关键点的识别与“2D到3D虚拟修复模型”进行比较非常不准确,因为每个人的面孔都不一样。
3、3DDFA:效果很差,我不知道为什么有那么多“github星星”。
4、通过卷积网络统计出关键点位图,角度也很不准确。
实验前的准备
首先我们使用的python版本是3.6.5所用到的模块如下:
opencv是将用来进行图像处理和生成。
numpy模块用来处理矩阵数据的运算。
pytorch模块是常用的用来搭建模型和训练的深度学习框架。
math是python中用来存储一些常见的数学函数库。
网络模型的定义和训练
(1)脸部特征提取:使用Retinaface提取面部框架,然后使用PFLD识别面部关键点。最后,关键点被跟踪以估计面部姿势。
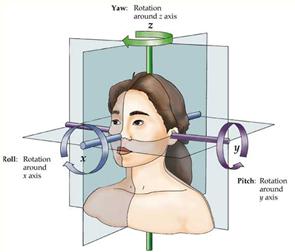
def calculate_PItch_yaw_roll(landmarks_2D, cam_w=256, cam_h=256,radians=False):""" Return thethe pitch yaw and roll angles associatedwith the input image.@param radians When True itreturns the angle in radians, otherwise in degrees."""assert landmarks_2D is not None,'landmarks_2D is None'# Estimated camera matrixvalues.c_x = cam_w / 2c_y = cam_h / 2f_x = c_x / np.tan(60 / 2 *np.pi / 180)f_y = f_xcamera_matrix =np.float32([[f_x, 0.0, c_x], [0.0, f_y, c_y],[0.0, 0.0, 1.0]])camera_distortion =np.float32([0.0, 0.0, 0.0, 0.0, 0.0])# dlib (68 landmark) trachedpoints# TRACKED_POINTS = [17, 21, 22,26, 36, 39, 42, 45, 31, 35, 48, 54, 57, 8]# wflw(98 landmark) trachedpoints# TRACKED_POINTS = [33, 38, 50,46, 60, 64, 68, 72, 55, 59, 76, 82, 85, 16]# X-Y-Z with X pointing forwardand Y on the left and Z up.# The X-Y-Z coordinates used arelike the standard coordinates of ROS (robotic operative system)# OpenCV uses the referenceusually used in computer vision:# X points to the right, Y down,Z to the frontlandmarks_3D = np.float32([[6.825897, 6.760612,4.402142], # LEFT_EYEBROW_LEFT,[1.330353, 7.122144,6.903745], # LEFT_EYEBROW_RIGHT,[-1.330353, 7.122144,6.903745], # RIGHT_EYEBROW_LEFT,[-6.825897, 6.760612,4.402142], # RIGHT_EYEBROW_RIGHT,[5.311432, 5.485328,3.987654], # LEFT_EYE_LEFT,[1.789930, 5.393625,4.413414], # LEFT_EYE_RIGHT,[-1.789930, 5.393625,4.413414], # RIGHT_EYE_LEFT,[-5.311432, 5.485328,3.987654], # RIGHT_EYE_RIGHT,[-2.005628, 1.409845,6.165652], # NOSE_LEFT,[-2.005628, 1.409845,6.165652], # NOSE_RIGHT,[2.774015, -2.080775,5.048531], # MOUTH_LEFT,[-2.774015, -2.080775,5.048531], # MOUTH_RIGHT,[0.000000, -3.116408, 6.097667], # LOWER_LIP,[0.000000, -7.415691,4.070434], # CHIN])landmarks_2D =np.asarray(landmarks_2D, dtype=np.float32).reshape(-1, 2)# Applying the PnP solver tofind the 3D pose of the head from the 2D position of the landmarks.# retval - bool# rvec - Output rotation vectorthat, together with tvec, brings points from the world coordinate system to thecamera coordinate system.# tvec - Output translationvector. It is the position of the world origin (SELLION) in camera co-ords_, rvec, tvec =cv2.solvePnP(landmarks_3D, landmarks_2D,camera_matrix, camera_distortion)#Get as input the rotationalvector, Return a rotational matrix# const double PI = 3.141592653;# double thetaz = atan2(r21,r11) / PI * 180;# double thetay = atan2(-1 *r31, sqrt(r32*r32 r33*r33)) / PI * 180;# double thetax = atan2(r32,r33) / PI * 180;rmat, _ = cv2.Rodrigues(rvec)pose_mat = cv2.hconcat((rmat,tvec))_, _, _, _, _, _, euler_angles =cv2.decomposeProjectionMatrix(pose_mat)return map(lambda k: k[0], euler_angles) # euler_angles contain (pitch,yaw, roll)
(2)计算和绘制特征图形函数的定义:收集面部角度转换数据,并通过数百人的面部的旋转关键点拟合了一个简单的线性模型。实验表明,简单的数学线性点模型更加有效和准确。
class AverageMeter(object):"""Computes and stores the average and current value"""def __init__(self):self.resetdef reset(self):self.val = 0self.avg = 0self.sum = 0self.count = 0def update(self, val, n=1):self.val = valself.sum = val * nself.count = nself.avg = self.sum / self.countdef vis_landmark(img_path, annotation, norm, point_num):"""line format: [img_name bbox_x1 bbox_y1 bbox_x2 bbox_y2 landmark_x1 landmark y1 ...]"""# check point lenassert len(line) == 1 4 point_num*2 # img_path bbox point_num*2img = cv2.imread(img_path)h, w = img.shape[:2]img_name = annotation[0]bbox_x1, bbox_y1, bbox_x2, bbox_y2 = annotation[1:5]landmark = annotation[5:]landmark_x = line[1 4::2]landmark_y = line[1 4 1::2]if norm:for i in range(len(landmark_x)):landmark_x[i] = landmark_x[i] * wlandmark_y[i] = landmark_y[i] * h# draw bbox and face landmarkcv2.rectangle(img, (int(bbox_x1), int(bbox_y1)), (int(bbox_x2), int(bbox_y2)), (0, 0, 255), 2)for i in range(len(landmark_x)):cv2.circle(img, (int(landmark_x[i]), int(landmark_y[i])), 2, (255, 0, 0), -1)cv2.imshow("image", img)cv2.waitKey(0)(3)网络层的定义:import torchimport torch.nn as nnimport mathdef conv_bn(inp, oup, kernel, stride, padding=1):return nn.Sequential(nn.Conv2d(inp, oup, kernel, stride, padding, bias=False),nn.BatchNorm2d(oup),nn.ReLU(inplace=True))def conv_1x1_bn(inp, oup):return nn.Sequential(nn.Conv2d(inp, oup, 1, 1, 0, bias=False),nn.BatchNorm2d(oup),nn.ReLU(inplace=True))class PFLDInference(nn.Module):def __init__(self):super(PFLDInference, self).__init__self.conv1 = nn.Conv2d(3, 64, kernel_size=3, stride=2, padding=1, bias=False)self.bn1 = nn.BatchNorm2d(64)self.relu = nn.ReLU(inplace=True)self.conv2 = nn.Conv2d(64, 64, kernel_size=3, stride=1, padding=1, bias=False)self.bn2 = nn.BatchNorm2d(64)self.relu = nn.ReLU(inplace=True)self.conv3_1 = InvertedResidual(64, 64, 2, False, 2)self.block3_2 = InvertedResidual(64, 64, 1, True, 2)self.block3_3 = InvertedResidual(64, 64, 1, True, 2)self.block3_4 = InvertedResidual(64, 64, 1, True, 2)self.block3_5 = InvertedResidual(64, 64, 1, True, 2)self.conv4_1 = InvertedResidual(64, 128, 2, False, 2)self.conv5_1 = InvertedResidual(128, 128, 1, False, 4)self.block5_2 = InvertedResidual(128, 128, 1, True, 4)self.block5_3 = InvertedResidual(128, 128, 1, True, 4)self.block5_4 = InvertedResidual(128, 128, 1, True, 4)self.block5_5 = InvertedResidual(128, 128, 1, True, 4)self.block5_6 = InvertedResidual(128, 128, 1, True, 4)self.conv6_1 = InvertedResidual(128, 16, 1, False, 2) # [16, 14, 14]self.conv7 = conv_bn(16, 32, 3, 2) # [32, 7, 7]self.conv8 = nn.Conv2d(32, 128, 7, 1, 0) # [128, 1, 1]self.bn8 = nn.BatchNorm2d(128)self.avg_pool1 = nn.AvgPool2d(14)self.avg_pool2 = nn.AvgPool2d(7)self.fc = nn.Linear(176, 196)
模型的调用和显示
(1)根据点坐标绘制标注图形:
def point_line(point,line):x1 = line[0]y1 = line[1]x2 = line[2]y2 = line[3]x3 = point[0]y3 = point[1]k1 = (y2 - y1)*1.0 /(x2 -x1)b1 = y1 *1.0 - x1 *k1 *1.0k2 = -1.0/k1b2 = y3 *1.0 -x3 * k2 *1.0x = (b2 - b1) * 1.0 /(k1 - k2)y = k1 * x *1.0 b1 *1.0return [x,y]def point_point(point_1,point_2):x1 = point_1[0]y1 = point_1[1]x2 = point_2[0]y2 = point_2[1]distance = ((x1-x2)**2 (y1-y2)**2)**0.5return distancedef point_line(point,line):x1 = line[0]y1 = line[1]x2 = line[2]y2 = line[3]x3 = point[0]y3 = point[1]k1 = (y2 - y1)*1.0 /(x2 -x1)b1 = y1 *1.0 - x1 *k1 *1.0k2 = -1.0/k1b2 = y3 *1.0 -x3 * k2 *1.0x = (b2 - b1) * 1.0 /(k1 - k2)y = k1 * x *1.0 b1 *1.0return [x,y](2)主函数定义:通过加载训练好的模型和定义好的特征参数,通过摄像头获取的视频流或是读取本地视频和图片进行输出姿态特点:
def main(args):checkpoint = torch.load(args.model_path, map_location=device)plfd_backbone = PFLDInference.to(device)plfd_backbone.load_state_dict(checkpoint['plfd_backbone'])plfd_backbone.evalplfd_backbone = plfd_backbone.to(device)transform = transforms.Compose([transforms.ToTensor()])videoCapture = cv2.VideoCapture(args.image_name)fps = videoCapture.get(cv2.CAP_PROP_FPS)size = (int(videoCapture.get(cv2.CAP_PROP_FRAME_WIDTH)),int(videoCapture.get(cv2.CAP_PROP_FRAME_HEIGHT)))print("fps:",fps,"size:",size)videoWriter = cv2.VideoWriter("./video/result.avi",cv2.VideoWriter_fourcc('X','V','I','D'),fps,size)success,img = videoCapture.readcv2.imwrite("1.jpg",img)while success:height, width = img.shape[:2]model_test = AntiSpoofPredict(args.device_id)image_bbox = model_test.get_bbox(img)x1 = image_bbox[0]y1 = image_bbox[1]x2 = image_bbox[0] image_bbox[2]y2 = image_bbox[1] image_bbox[3]w = x2 - x1h = y2 - y1size = int(max([w, h]))cx = x1 w/2cy = y1 h/2x1 = cx - size/2x2 = x1 sizey1 = cy - size/2y2 = y1 sizedx = max(0, -x1)dy = max(0, -y1)x1 = max(0, x1)y1 = max(0, y1)edx = max(0, x2 - width)edy = max(0, y2 - height)x2 = min(width, x2)y2 = min(height, y2)cropped = img[int(y1):int(y2), int(x1):int(x2)]if (dx > 0 or dy > 0 or edx > 0 or edy > 0):cropped = cv2.copyMakeBorder(cropped, dy, edy, dx, edx, cv2.BORDER_CONSTANT, 0)cropped = cv2.resize(cropped, (112, 112))input = cv2.resize(cropped, (112, 112))input = cv2.cvtColor(input, cv2.COLOR_BGR2RGB)input = transform(input).unsqueeze(0).to(device)_, landmarks = plfd_backbone(input)pre_landmark = landmarks[0]pre_landmark = pre_landmark.cpu.detach.numpy.reshape(-1, 2) * [112, 112]point_dict = {}i = 0for (x,y) in pre_landmark.astype(np.float32):point_dict[f'{i}'] = [x,y]i = 1效果如下图所示:
源码地址:
https://github.com/WIKI2020/FacePose_pytorch
#欢迎留言在评论区和我们讨论#
看完本文,对于python实现人脸检测你有什么想说的?
欢迎在评论区留言
我们将在 10 月 22 日精选出 3 条优质留言
赠送价值148元的《python机器学习一本通》纸质书籍一本哦!
,


免责声明:本文仅代表文章作者的个人观点,与本站无关。其原创性、真实性以及文中陈述文字和内容未经本站证实,对本文以及其中全部或者部分内容文字的真实性、完整性和原创性本站不作任何保证或承诺,请读者仅作参考,并自行核实相关内容。文章投诉邮箱:anhduc.ph@yahoo.com