python深度学习实现图像多分类(使用Python的scikit-image模块进行图像分割)
在本文中,我们将详细讨论scikit-image,这是一个基于Python的图像处理库。
Scikit-image

scikit-image.org
Scikit-image是一个专用于图像处理的Python包。
安装
scikit-image可以按如下方式安装:
pip install -U scikit-image(Linux and OSX) pip install scikit-image(Windows) # For Conda-based distributions conda install scikit-image

Python中的图像概述
在继续进行图像分割技术之前,我们必须熟悉scikit image生态系统以及它如何处理图像。
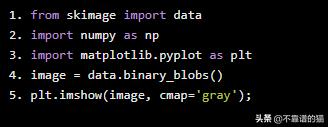
- 从skimage库导入GrayScale图像
skimage数据模块包含一些内置的示例数据集,这些数据集通常以jpeg或png格式存储。
from skimage import data import numpy as np import matplotlib.pyplot as plt image = data.binary_blobs() plt.imshow(image, cmap='gray');

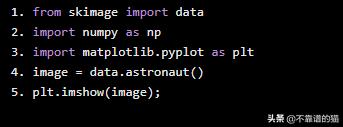
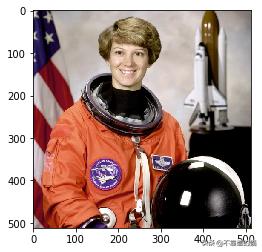
- 从skimage库导入彩色图像
from skimage import data import numpy as np import matplotlib.pyplot as plt image = data.astronaut() plt.imshow(image);
- 从外部源导入图像
# The I/O module is used for importing the image from skimage import data import numpy as np import matplotlib.pyplot as plt from skimage import io image = io.imread('skimage_logo.png') plt.imshow(image);


- 加载多个图像
images = io.ImageCollection('../images/*.png:../images/*.jpg') print('Type:', type(images)) images.files

Out[]: Type: <class ‘skimage.io.collection.ImageCollection’>
- 保存图像
#Saving file as ‘logo.png’ io.imsave('logo.png', logo)

现在我们有了关于scikit-image的概念,让我们来深入了解图像分割的细节。图像分割本质上是将数字图像分割成多个部分,以简化和/或将图像的表示形式转换成更有意义和更容易分析的东西的过程。
在本文中,我们将把分割过程看作有监督和无监督算法的组合。

scikit-image库中提供了一些分段算法
监督分割:一些先验知识,可能来自人类输入,用于指导算法。
无监督分割:无需先验知识。这些算法尝试自动将图像细分为有意义的区域。用户仍然可以调整某些设置以获得所需的输出。
让我们从最简单的算法Thresholding开始。
阈值
这是通过选择高于或低于特定阈值的像素来从背景中分割对象的最简单方法。当我们打算从背景中分割对象时,这通常很有用。
让我们在预装了scikit-image数据集测试一下。
导入Python库
import numpy as np import matplotlib.pyplot as plt import skimage.data as data import skimage.segmentation as seg import skimage.filters as filters import skimage.draw as draw import skimage.color as color

图片
text = data.page() image_show(text)
这个图像有点暗,但也许我们仍然可以选择一个值,无需任何高级算法就能给出合理的分割。现在,为了帮助我们选择该值,我们将使用直方图。
直方图是显示图像中不同强度值下的像素数量的图形。简单地说,直方图是一种图形,其中x轴表示图像中的所有值,而y轴表示这些值的频率。
fig, ax = plt.subplots(1, 1) ax.hist(text.ravel(), bins=32, range=[0, 256]) ax.set_xlim(0, 256);


我们的例子恰好是一个8位图像,所以我们在x轴上总共有256个可能的值。我们观察到像素的浓度比较淡(0:黑色,255:白色)。这很可能是我们的文字背景。一个理想的分割直方图应该是双峰的,并且是完全分离的,这样我们就可以在中间选择一个数字。现在,让我们尝试制作一些基于简单阈值的分割图像。
监督阈值
由于我们将自己选择阈值,我们称之为监督阈值。
text_segmented = text > (value concluded from histogram i.e 50,70,120 ) image_show(text_segmented);


上:text> 50 | 中:text> 70 | 下:text> 120
我们没有得到任何理想的结果,因为左边的阴影会产生问题。让我们现在尝试使用无监督阈值处理。
无监督阈值
Scikit-image有许多自动阈值处理方法,在选择最佳阈值时无需输入。一些方法是:otsu, li, local.
text_threshold = filters.threshold_ # Hit tab with the cursor after the underscore to get all the methods. image_show(text < text_threshold);


上:otsu 下:li
对于local,我们还需要指定block_size。Offset有助于优化图像以获得更好的结果。
text_threshold = filters.threshold_local(text,block_size=51, offset=10) image_show(text > text_threshold);


local thresholding
这很好,在很大程度上消除了噪声区域。
监督分割阈值处理是一个非常基本的分割过程,在高对比度图像中无法正常工作,我们需要更高级的工具。
对于本节,我们将使用免费提供的示例图像,并尝试使用监督分割技术对头部进行分割。
# import the image from skimage import io image = io.imread('girl.jpg') plt.imshow(image);


在对图像进行任何分割之前,使用一些过滤器去噪是一个好主意。
但是,在我们的例子中,图像不是很嘈杂,所以我们会照原样。下一步将使用rgb2gray将图像转换为灰度。
image_gray = color.rgb2gray(image) image_show(image_gray);


我们将使用两种完全不同原理的分割方法。
活动轮廓分割
活动轮廓分割也称为snakes,使用用户定义的轮廓或线进行初始化,然后该轮廓慢慢收缩。
对于我们的示例图像,让我们在人的头部周围画一个圆来初始化snake。
def circle_points(resolution, center, radius): """ Generate points which define a circle on an image.Centre refers to the centre of the circle """ radians = np.linspace(0, 2*np.pi, resolution) c = center[1] radius*np.cos(radians)#polar co-ordinates r = center[0] radius*np.sin(radians) return np.array([c, r]).T # Exclude last point because a closed path should not have duplicate points points = circle_points(200, [80, 250], 80)[:-1]

上述计算计算圆周边上的点的x和y坐标。既然我们已经给出了200的分辨率,它将计算200个这样的点。
fig, ax = image_show(image) ax.plot(points[:, 0], points[:, 1], '--r', lw=3)


然后,算法通过将闭合曲线拟合到脸部的边缘来从人的图像的其余部分分割人的面部。
snake = seg.active_contour(astronaut_gray, points) fig, ax = image_show(image) ax.plot(points[:, 0], points[:, 1], '--r', lw=3) ax.plot(snake[:, 0], snake[:, 1], '-b', lw=3);


我们可以调整调用的参数alpha和 beta。较高的alpha值会使这条snake收缩得更快,而beta会让snake变得更加平滑。
snake = seg.active_contour(image_gray, points,alpha=0.06,beta=0.3) fig, ax = image_show(image) ax.plot(points[:, 0], points[:, 1], '--r', lw=3) ax.plot(snake[:, 0], snake[:, 1], '-b', lw=3);


随机游走分割
在这种方法中,用户交互地给少量像素标上标签,这些像素被称为标签。然后想象每个未标记的像素释放一个random walker,然后可以确定一个random walker从每个未标记的像素开始并到达其中一个预先标记的像素的概率。将每个像素分配给计算概率最大的标签,可以得到高质量的图像分割。
我们将重用前面示例中的种子值。我们可以做不同的初始化,但为了简单起见,我们还是用圆吧。
image_labels = np.zeros(image_gray.shape, dtype=np.uint8)
随机游走算法期望标签图像作为输入。所以我们将有一个更大的圆圈,包括人的整个脸部和另一个靠近脸部中间的小圆圈。
indices = draw.circle_perimeter(80, 250,20)#from here image_labels[indices] = 1 image_labels[points[:, 1].astype(np.int), points[:, 0].astype(np.int)] = 2 image_show(image_labels);


现在,让我们使用Random Walker,看看会发生什么。
image_segmented = seg.random_walker(image_gray, image_labels) # Check our results fig, ax = image_show(image_gray) ax.imshow(image_segmented == 1, alpha=0.3);


看起来不像我们想要的边缘。为了解决这种情况,我们可以调优beta参数,直到得到所需的结果。经过多次尝试,3000的值工作得相当好。
image_segmented = seg.random_walker(image_gray, image_labels, beta = 3000) # Check our results fig, ax = image_show(image_gray) ax.imshow(image_segmented == 1, alpha=0.3);


这就是监督分割,我们必须提供特定的输入,也必须调整特定的参数。
无监督分割无监督分割不需要先验知识。考虑这样的图像,该图像太大以致不能同时考虑所有像素。在这种情况下,无监督分割可以将图像分割成几个子区域,所以不是数百万像素,而是数十到数百个区域。让我们来看看这两种算法:
SLIC(简单线性迭代聚类)
SLIC算法实际上使用了一种名为K-Means的机器学习算法。它接收图像的所有像素值并尝试将它们分离到给定数量的子区域中。
SLIC以彩色工作,因此我们将使用原始图像。
image_slic = seg.slic(image,n_segments=155)
我们所做的只是将我们找到的每个子图像或子区域设置为该区域的平均值,这使得它看起来不像随机分配的颜色拼凑而更像一个图像被分解成类似的区域。
# label2rgb replaces each discrete label with the average interior color image_show(color.label2rgb(image_slic, image, kind='avg'));


我们已将此图像从512 * 512 = 262,000像素缩小到155个区域。
Felzenszwalb
该算法还使用了一种称为最小生成树聚类的机器学习算法。Felzenszwaib没有告诉我们图像将被分割成的聚类的确切数量。它会运行并生成它认为适合于图像上给定的缩放因子的任意多的聚类。
image_felzenszwalb = seg.felzenszwalb(image) image_show(image_felzenszwalb);


这里有很多区域。我们来计算唯一区域的数量。
np.unique(astronaut_felzenszwalb).size
3368
现在让我们使用区域平均值重新着色它们,就像我们在SLIC算法中所做的那样。
image_felzenszwalb_colored = color.label2rgb(image_felzenszwalb, image, kind='avg') image_show(image_felzenszwalb_colored);

现在我们得到了更小的区域。如果我们想要更少的区域,我们可以改变scale参数,或者从这里开始并将它们组合起来。这种方法有时被称为over-segmentation。

这看起来更像是一张图片,它基本上只是减少了颜色数量。要再次组合它们,您可以使用区域邻接图(RAG)。
结论图像分割是图像处理中的一个非常重要的步骤。它是一个活跃的研究领域,应用范围从计算机视觉到医学图像,交通和视频监控。Python以scikit-image的形式提供了一个强大的库,其中包含大量用于图像处理的算法。它是免费和不受限制的,背后有一个活跃的社区。
,免责声明:本文仅代表文章作者的个人观点,与本站无关。其原创性、真实性以及文中陈述文字和内容未经本站证实,对本文以及其中全部或者部分内容文字的真实性、完整性和原创性本站不作任何保证或承诺,请读者仅作参考,并自行核实相关内容。文章投诉邮箱:anhduc.ph@yahoo.com