vscode代码规范插件(手把手带你开发一款提效工具--VScode插件)
想必每个熟练的前端弄潮者,在熟练业务之后,常常都会将组件进行抽离公共组件,可以大大的提高开发效率。然而抽离公共组件之后,日常的开发便是创建相同的文件夹,修改router ,修改表单的属性 fields 和 prop 等,重复的创建相同的文件夹,重复修改文件 name , 重复的写 router 等,但是作为组内不同的人员,风格又不一致,所以能不能即规范代码的风格,又能快速的创建模板呢。
比如我们常见的模板类型
├─componentsName
│   ├─api
│   │  index.js
│		├─components
│		│	 list-table.vue
│		│	 list-search.vue
│		│	 index.js
│		├─config
│		│	 index.js
│   index.vue
│   route.js
通过 官方文档 的学习,我们可以发现 vscode 插件扩展的方式,去实现这个功能。
- 环境安装
npm i -g yo generator-code // 官方插件开发脚手架
yo code // 执行脚手架命令
根据步骤我们选择创建 New Extension
可以选择自己喜欢的语言 Javascript 或者 typescript , 这边笔者选的是 JavaScript

同样,我们从国际惯例的 Hello World 开始,选择好相应的配置
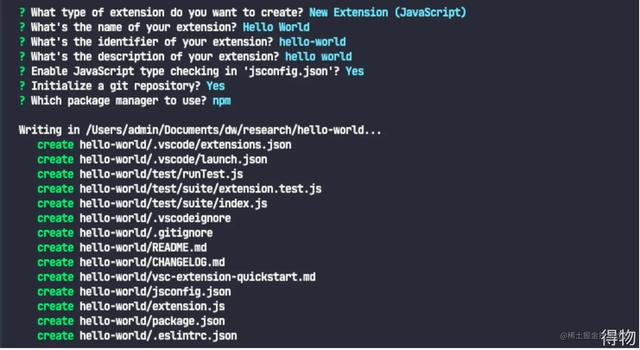
项目结构比较简单,主要的文件为 package.json 和 extension.js 这两个文件
{
	"name": "hello-world", // 插件名称
	"displayName": "Hello World",
	"description": "hello world",
	"version": "0.0.1", // 插件版本
	"engines": {
		"vscode": "^1.63.0" // vscode的版本
	},
	"categories": [
		"Other"
	],
  // 扩展的激活事件
	"activationEvents": [
		"onCommand:hello-world.helloWorld"
	],
  // 入口文件
	"main": "./extension.js",
  // vscode插件大部分功能配置都在这里配置
	"contributes": {
		"commands": [
			{
				"command": "hello-world.helloWorld",
				"title": "Hello World"
			}
		]
	},
	"scripts": {
		"lint": "eslint .",
		"pretest": "npm run lint",
		"test": "node ./test/runTest.js"
	},
	"devDependencies": {
		"@types/vscode": "^1.63.0",
		"@types/glob": "^7.1.4",
		"@types/mocha": "^9.0.0",
		"@types/node": "14.x",
		"eslint": "^7.32.0",
		"glob": "^7.1.7",
		"mocha": "^9.1.1",
		"typescript": "^4.4.3",
		"@vscode/test-electron": "^1.6.2"
	}
}
extension.js 文件内容如下
// The module 'vscode' contains the VS Code extensibility API
// Import the module and reference it with the alias vscode in your code below
const vscode = require('vscode');

// this method is called when your extension is activated
// your extension is activated the very first time the command is executed

/**
 * @param {vscode.ExtensionContext} context
 */
function activate(context) {

	// Use the console to output diagnostic information (console.log) and errors (console.error)
	// This line of code will only be executed once when your extension is activated
	console.log('Congratulations, your extension "hello-world" is now active!');

	// The command has been defined in the package.json File
	// Now provide the implementation of the command with  registerCommand
	// The commandId parameter must match the command field in package.json
	let disposable = vscode.commands.registerCommand('hello-world.helloWorld', function () {
		// The code you place here will be executed every time your command is executed

		// Display a message box to the user
		vscode.window.showInformationMessage('Hello World from Hello World!');
	});

	context.subscriptions.push(disposable);
}

// this method is called when your extension is deactivated
function deactivate() {}

module.exports = {
	activate,
	deactivate
}
- main 定义了整个插件的主入口,所以看到这里,按照我们的惯性,可以新建 src 文件夹,将 extension.js 已到 src 文件夹下面。
- contributes.commands 注册了名为 hello-world.helloWorld 的命令,并在 src/extension.js 实现。
- 定义完命令之后,还需要在 activationEvents 上添加 onCommand:hello-world.helloWorld 。
新建完成之后,工程已经帮我们配置好调试参数

我们只需要点击 Run Extension 即可,此时将打开一个新的vscode 窗口,显示Extension Development Host

此时我们按下快捷键 command shift P ,输入 Hello 即可看到我们编写的插件了,选中我们的插件,即可发现右下角的弹窗 Hello World from Hello World!

在我们的 package.json 中,添加如下代码
"contributes": {
		"commands": [
			{
				"command": "hello-world.helloWorld",
				"title": "Hello World"
			}
		],
    "keybindings": [
      {
        "command": "hello-world.helloWorld",
        "key": "ctrl f10",
        "mac": "cmd f10",
        "when": "editorFocus"
      }
    ],
    "menus": {
      "explorer/context": [
        {
          "command": "hello-world.helloWorld",
          "group": "navigation", // 菜单位于最上面
          "when": "explorerResourceIsFolder" // 只有是文件夹时才能唤起菜单
        }
      ]
    }
	},
在文件夹区域右键,即可看到我们的菜单命令了, 同时也可以看到快捷键。

至此,我们已经完成了一个简单的 vscode 插件。
4. 改造修改文件目录如下
├─node_modules
├─src
│   main.js
├─test
│ .eslintrc.json
│ .gitignore
│ .vscodeignore
│ jsconfig.json
│ package-lock.json
│ package.json
│	READEME.md
│ vsc-extension-quickstart.md
修改 package.json 文件
{
	"name": "hello-template",
	"displayName": "hello-template",
	"description": "hello world",
  "publisher": "retrychx",
	"version": "0.0.1",
	"engines": {
		"vscode": "^1.63.0"
	},
	"categories": [
		"Other"
	],
	"activationEvents": [
		"onCommand:hello-template"
	],
	"main": "./src/main.js",
	"contributes": {
		"commands": [
			{
				"command": "hello-template",
				"title": "Hello Template"
			}
		],
    "keybindings": [
      {
        "command": "hello-template",
        "key": "ctrl f10",
        "mac": "cmd f10",
        "when": "editorFocus"
      }
    ],
    "menus": {
      "explorer/context": [
        {
          "command": "hello-template",
          "group": "navigation",
          "when": "explorerResourceIsFolder"
        }
      ]
    }
	},
	"scripts": {
		"lint": "eslint .",
		"pretest": "npm run lint",
		"test": "node ./test/runTest.js"
	},
	"devDependencies": {
		"@types/vscode": "^1.63.0",
		"@types/glob": "^7.1.4",
		"@types/mocha": "^9.0.0",
		"@types/node": "14.x",
		"eslint": "^7.32.0",
		"glob": "^7.1.7",
		"mocha": "^9.1.1",
		"typescript": "^4.4.3",
		"@vscode/test-electron": "^1.6.2"
	}
}
修改 src/main.js 文件
// The module 'vscode' contains the VS Code extensibility API
// Import the module and reference it with the alias vscode in your code below
const vscode = require('vscode');

// this method is called when your extension is activated
// your extension is activated the very first time the command is executed

/**
 * @param {vscode.ExtensionContext} context
 */
function activate(context) {

	// Use the console to output diagnostic information (console.log) and errors (console.error)
	// This line of code will only be executed once when your extension is activated
	console.log('Congratulations, your extension "hello-world" is now active!');

	// The command has been defined in the package.json file
	// Now provide the implementation of the command with  registerCommand
	// The commandId parameter must match the command field in package.json
	let disposable = vscode.commands.registerCommand('hello-template', function () {
		// The code you place here will be executed every time your command is executed

		// Display a message box to the user
		vscode.window.showInformationMessage('test');
	});

	context.subscriptions.push(disposable);
}

// this method is called when your extension is deactivated
function deactivate() {}

module.exports = {
	activate,
	deactivate
}
复制代码
在 registerCommand 方法处,修改命令,和 package.json 中的 command 中保持一致,然后调试运行我们的 vscode ,快捷键召唤出我们的插件,可以看到我们的插件名称 Hello Template ,点击,即可看到跳出的弹窗

在 src/ 下面,我们新建 template.js 文件,在里面声明我们要新建的模板。
- route.js 模板
由于需要路由名称和标题两个变量,所以声明了两个变量
const routeTemplate = params =>
`
import List from './index'

export default [
  {
    path: '${params.path}',
    name: '${params.path}',
    meta: {
      title: '${params.title}'
    },
    component: List
  }
]
`
- index.js 入口文件模板
const indexTemplate =
`
<template>
  <div></div>
</template>

<script>
import { ListSearch, ListTable } from './components'
import * as API from './api/index'
import utils from '@/utils'
export default {
  components: { ListSearch, ListTable },
  data() {
    return {
      },
    }
  },
  mounted() {
  },
  methods: {
  },
}
</script>

<style>

</style>
`
根据封装的组件,所以可以依次新建不同的模板:configTemplate 、apiTemplate 、comIndexTemplate、searchTemplate 、tableTemplate 等,导出我们需要的模板
const config = {
  routeTemplate: routeTemplate,
  indexTemplate: indexTemplate,
  configTemplate: configTemplate,
  apiTemplate: apiTemplate,
  comIndexTemplate: comIndexTemplate,
  searchTemplate: searchTemplate,
  tableTemplate: tableTemplate
}

module.exports = config
由于我们需要异步处理,所以引入async
let disposable = vscode.commands.registerCommand('hello-template', async url => {
		 // 设置输入框提示
     const options = {
      prompt: '请输入模板名称',
      placeHolder: '模板名称'
    }
    // 输入模板名称
    const templateName = await vscode.window.showInputBox(options)

    // 设置标题
    const optionsTitle = {
      prompt: '请输入标题名称',
      placeHolder: '标题名称'
    }
    // 输入模板名称
    const templateTitle = await vscode.window.showInputBox(optionsTitle)

    // 设置路径
    const optionsRoute = {
      prompt: '请输入路径名称',
      placeHolder: '路径名称'
    }
    // 输入路径名称
    const templateRoute = await vscode.window.showInputBox(optionsRoute)

    const params = {
      path: templateRoute,
      title: templateTitle
    }
	});
运行调试,我们可以看到调用我们的插件,可以看到出现了输入框:

通过输入名称,我们可以拿到自己想要的变量。然后我们就可以调用 fs 和 path 两个模块就可以写我们自己的文件了。
由于为了保证,我们的创建文件和文件夹的顺序。
首先我们用了 existsSync 和 mkdirSync 来创建文件夹;然后我们再用 existsSync 和 writeFileSync 来创建文件,然后再最后,做个成功的提示即可:
vscode.window.showInformationMessage('模板创建成功')
至此,我们已经完成了所有的编码。那么我们就看一下最后的调试结果。
在文件夹处右键,召唤出我们的插件指令Hello Template

输入对应的名称之后,我们可以看到在右键的文件夹下,创建了我们想要的模板。

我们就可以节省很多重复的工作了。
7. 引入新功能由于在开发过程中,后端给的开发文档,提供的接口都是来自mock的连接,这个时候就在想能不能解析mock的接口数据自动引入接口注释。
const request = require('request')

const YAPIURL = 'https://mock.shizhuang-inc.com/api/interface/get'
const param = 'token' // 个人的token

function getYapi(id) {
  const url = `${YAPIURL}?id=${id}&token=${param}`
  return new Promise(async (resolve, reject) => {
    request(url, function(error, response,body) {
      debugger
      if(error) {
        reject(error)
      }
      const bodyToJson = JSON.parse(body)
      // 接口id不存在
      if(!bodyToJson.data) {
        reject(null)
      }
      resolve({
        title: bodyToJson.data.title,
        path: bodyToJson.data.path
      })
    })
  })
}

module.exports = {
  getYapi
}
- 添加右键菜单
在package.json 里面
"menus": {
      "editor/context": [
        {
          "when": "resourceLangId == javascript", // 当文件为js文件的时候
          "command": "erp-addInterface",
          "group": "navigation"
        }
      ]
    }
在main.js 中,注册command事件
let addDisposable = vscode.commands.registerCommand('erp-addInterface', async url => {
     // 设置输入框提示
     const options = {
      prompt: '请输入接口Id',
      placeHolder: '接口Id'
    }
    // 输入路径名称
    const apiTag = await vscode.window.showInputBox(options)
    if(! apiTag) {
      vscode.window.showInformationMessage('输入正确的接口Id')
      return
    }
    try {
      const res = await api.getYapi( apiTag)
      const apiName = res.path ? res.path.split('/').pop() : ''
      res.name = apiName

      const interfaceTemplate = config.interfaceTemplate(res)

      await fs.appendFileSync(url.path, interfaceTemplate, 'utf8')

      vscode.window.showInformationMessage('接口添加成功')
    } catch (error) {
      if(!error) {
        vscode.window.showInformationMessage('接口Id不存在')
        return
      }
      vscode.window.showInformationMessage(error)
    }
- 查看效果

可以生成注释和接口,方便快捷。
打包无论是本地打包还是发布到应用市场,我们都要借助vsce 这个工具。
1. 安装
npm install vsce -g
打包成 vsix 文件
vsce package
发现报错如下:

错误指出我们要修改 README.md 文件,我们修改以下文件,再次执行打包。

按照指示命令,一步步的执行,打包成功,看一下我们的项目目录,可以看到我们的打包文件。

打开发布市场 官方网站 , 创建自己的发布账号,然后记录下自己的个人 token, 即可开始发布。
vsce publish
输入自己的账号,和 token 之后就可以发布了。等待几分钟后就可以在网页看到自己的项目

例如笔者发布的插件 erp-template ,在插件市场搜索可以看到,我们自己的插件了

好了,至此,vscode 插件开发已经完成了。
总结这里仅仅是想到的一个开发场景,相对来说,只是提供一个开发思路,在开发过程中,可以多进行思考,做一些有趣的事情。
,
免责声明:本文仅代表文章作者的个人观点,与本站无关。其原创性、真实性以及文中陈述文字和内容未经本站证实,对本文以及其中全部或者部分内容文字的真实性、完整性和原创性本站不作任何保证或承诺,请读者仅作参考,并自行核实相关内容。文章投诉邮箱:anhduc.ph@yahoo.com